

Zapier is a game-changing automation tool that helps businesses and individuals streamline workflows by connecting their favorite apps. However, setting up Zaps incorrectly can lead to inefficiencies and wasted effort. This guide will walk you through common Zapier mistakes and how to avoid them, ensuring your automation run smoothly and effectively.
Table of Contents
Who is Zapier For?
Zapier is a powerful automation tool designed for businesses, freelancers, and teams looking to streamline their workflows without coding. Whether you’re an entrepreneur, marketer, or developer, Zapier can help automate repetitive tasks and improve efficiency.
1. Small and Medium-Sized Businesses (SMBs)
For SMBs, Zapier eliminates the need for manual data entry and repetitive tasks. It connects essential apps like Slack, Trello, Google Sheets, and HubSpot, allowing teams to automate lead management, customer support, and internal communications.
2. Freelancers and Solopreneurs
Freelancers often juggle multiple tools for client management, invoicing, and project tracking. With Zapier, they can create seamless workflows between Calendly, QuickBooks, Notion, and Gmail, saving time and reducing administrative work.
3. Marketing and Sales Teams
Marketers and sales professionals use Zapier to automate lead generation, email marketing, and CRM updates. For example, they can set up a Zap that automatically adds new Facebook ad leads to a Mailchimp email list, ensuring timely follow-ups.
4. Customer Support Teams
Zapier helps support teams by integrating platforms like Zendesk, Intercom, and Google Drive, ensuring that tickets are assigned automatically, responses are streamlined, and customer data is synced across apps.
5. Developers and Tech Teams
Even though Zapier is a no-code tool, developers can use Zapier Webhooks, API integrations, and automation triggers to enhance their workflows. It helps them automate deployments, error logging, and data transfers between platforms.
How Zapier Works
Zapier is an automation tool that connects your favorite apps to eliminate manual tasks. It works by setting up workflows called Zaps, which automatically transfer data between different apps based on triggers and actions. This Zapier 101 guide explains the core concepts you need to know.
1. Understanding Zaps, Triggers, and Actions
A Zap is an automated workflow consisting of:
- Trigger – The event that starts the automation (e.g., receiving a new email in Gmail).
- Action – The task Zapier performs in response to the trigger (e.g., saving the email to Google Drive).
For example, you can create a Zap that automatically saves new email attachments from Gmail to Dropbox without manual effort.
2. Multi-Step Zaps for Advanced Automation
Zapier allows you to create single-step Zaps (one trigger and one action) or multi-step Zaps that link multiple apps.
For instance, a multi-step Zap could:
- Capture a new lead from a Facebook ad (Trigger).
- Add the lead’s details to Google Sheets (Action 1).
- Send an automated follow-up email via Mailchimp (Action 2).
3. Filters, Paths, and Conditional Logic
Zapier provides additional tools to refine automations:
- Filters – Run Zaps only when specific conditions are met (e.g., trigger only for emails with attachments).
- Paths – Create different outcomes based on conditions (e.g., route leads to different sales reps based on location).
- Delays – Pause actions for a set time (e.g., send a reminder email 24 hours after a form submission).
4. Connecting Apps with Zapier
Zapier supports thousands of integrations, including Google Workspace, Slack, Trello, Notion, and more. Setting up a Zap is as simple as:
- Selecting a Trigger App (e.g., Gmail).
- Choosing a Trigger Event (e.g., New Email).
- Selecting an Action App (e.g., Google Drive).
- Defining the Action (e.g., Save attachment).
Setting Up Your First Zap
Getting started with Zapier 101 is easy, even if you have no coding experience. In just a few steps, you can create a Zap—an automated workflow that connects two or more apps to handle repetitive tasks for you.
Step 1: Sign Up for Zapier
First, go to Zapier.com and create a free account. Once you’re logged in, you’ll see the Zapier Dashboard, where you can manage and create automations.
Step 2: Choose a Trigger App
A Zap starts with a Trigger—an event in one app that kicks off the automation.
- Click “Create a Zap.”
- Select a Trigger App (e.g., Gmail).
- Choose a Trigger Event (e.g., “New Email Received”).
- Connect your account and test the trigger to ensure Zapier pulls the correct data.
Step 3: Set Up an Action
Next, you need to define what happens when the trigger occurs. This is called an Action.
- Choose an Action App (e.g., Google Sheets).
- Select an Action Event (e.g., “Add Row to Spreadsheet”).
- Map the data from your Trigger App to your Action App (e.g., extract email details and insert them into a spreadsheet).
- Test the action to make sure it works as expected.
Step 4: Add More Steps (Optional)
If needed, you can create Multi-Step Zaps by adding additional actions, such as:
- Sending a Slack notification.
- Adding the contact to a CRM.
- Scheduling a follow-up email.
Step 5: Turn On Your Zap
Once everything is set up and tested, click “Publish Zap.” Your automation will now run in the background, handling tasks without manual effort.
Top Zapier Integrations
One of the biggest strengths of Zapier is its ability to connect thousands of apps to automate workflows effortlessly. Whether you’re managing emails, marketing campaigns, customer support, or project management, Zapier offers integrations that can save time and improve efficiency. In this Zapier 101 guide, we’ll explore some of the top Zapier integrations that businesses and professionals use daily.
1. Gmail + Google Sheets
📌 Use Case: Automatically log new emails into a spreadsheet.
✅ Example: Whenever you receive an email with a specific subject, Zapier adds the details to a Google Sheets file, keeping a record without manual data entry.
2. Slack + Trello
📌 Use Case: Keep teams updated on project tasks.
✅ Example: When a new Trello card is created, Zapier sends an automatic message to a Slack channel, ensuring team members are notified instantly.
3. Facebook Lead Ads + Mailchimp
📌 Use Case: Automate email marketing for new leads.
✅ Example: When someone fills out a Facebook Lead Ad, their information is automatically added to a Mailchimp list, triggering an email sequence.
4. Shopify + QuickBooks
📌 Use Case: Simplify eCommerce accounting.
✅ Example: Each time a new order is placed in Shopify, Zapier creates a sales entry in QuickBooks, keeping finances organized.
5. Calendly + Zoom
📌 Use Case: Schedule and manage online meetings efficiently.
✅ Example: When a meeting is booked via Calendly, Zapier automatically generates a Zoom link and emails it to the attendee.
6. HubSpot + Google Forms
📌 Use Case: Capture and organize lead information.
✅ Example: When a prospect submits a Google Form, Zapier creates a contact in HubSpot, ensuring sales teams never miss a lead.
7. Instagram + Google Drive
📌 Use Case: Backup social media content automatically.
✅ Example: Each time a new photo is posted on Instagram, Zapier saves it to a designated Google Drive folder.
8. Stripe + Slack
📌 Use Case: Get instant payment notifications.
✅ Example: Whenever a new payment is processed through Stripe, Zapier sends a real-time notification to a Slack channel, keeping teams updated on revenue.
Zapier Pricing Plans
Understanding Zapier pricing plans is essential when choosing the right automation solution for your needs. Whether you’re a freelancer, small business, or large enterprise, Zapier offers multiple plans to fit different levels of automation. This Zapier 101 guide breaks down the pricing tiers and their features.
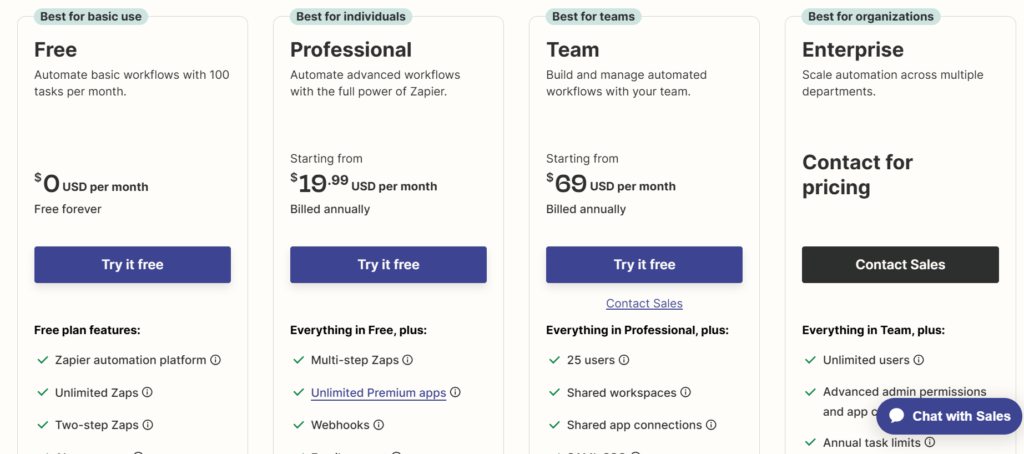
1. Free Plan (Best for Beginners)
✅ Cost: $0/month
✅ Features:
- 5 single-step Zaps
- Runs every 15 minutes
- 100 tasks per month
🔹 Who is it for? This plan is ideal for individuals or small businesses testing basic automations.
2. Professional Plan (Best for Growing Businesses)
✅ Cost: Starts at $19/month (billed annually)
✅ Features:
- Unlimited Zaps
- 2,000+ tasks per month
- Premium app integrations (e.g., Salesforce, Shopify)
- Custom logic with Paths
🔹 Who is it for? Great for growing businesses that need premium integrations and advanced automation options.
3. Team Plan (Best for Collaborative Teams)
✅ Cost: Starts at $69/month per user (billed annually)
✅ Features:
- Shared workspace for teams
- 50,000+ tasks per month
- Advanced admin controls
- Priority support
🔹 Who is it for? Designed for companies that need team-based workflow automation with centralized control.
4. Company Plan (Best for Large Enterprises)
✅ Cost: Custom pricing
✅ Features:
- Unlimited tasks and users
- Enterprise-grade security
- Dedicated account manager
- Advanced integrations and API access
🔹 Who is it for? Large businesses that require high-volume automation, security, and dedicated support.
Zapier vs. Competitors
When it comes to automation tools, Zapier is one of the most popular options. However, several competitors, such as Make (formerly Integromat), Automate.io, Pabbly Connect, and Microsoft Power Automate, offer similar features. In this Zapier 101 guide, we’ll compare Zapier with its top competitors to help you decide which tool best fits your needs.
1. Zapier vs. Make (Integromat)
✅ Zapier: Best for beginners and businesses looking for a no-code automation tool with a simple interface.
✅ Make: More visual and flexible, ideal for advanced users who need complex workflows with conditional logic.
🔹 Key Difference: Make offers a visual workflow builder, while Zapier focuses on a straightforward, step-by-step approach.
2. Zapier vs. Automate.io
✅ Zapier: Supports thousands of app integrations and offers a more extensive automation ecosystem.
✅ Automate.io: Cheaper alternative with slightly fewer integrations but strong features for small businesses.
🔹 Key Difference: Automate.io is more budget-friendly, but Zapier has a broader range of app connections and advanced automation tools.
3. Zapier vs. Pabbly Connect
✅ Zapier: Offers user-friendly automation with extensive documentation and support.
✅ Pabbly Connect: Provides a one-time payment option, making it more cost-effective in the long run.
🔹 Key Difference: Zapier uses a monthly subscription model, while Pabbly Connect offers lifetime deals with a lower long-term cost.
4. Zapier vs. Microsoft Power Automate
✅ Zapier: Works with a wide variety of third-party applications, making it suitable for businesses of all sizes.
✅ Microsoft Power Automate: Integrates deeply with Microsoft apps like Outlook, Teams, and SharePoint, making it the best choice for Microsoft users.
🔹 Key Difference: Power Automate is best for Microsoft ecosystem users, while Zapier works better for businesses using multiple third-party apps.
Zapier Tips & Tricks
Mastering Zapier 101 can help you automate workflows more efficiently and save hours of manual work. Whether you’re a beginner or an experienced user, these Zapier tips and tricks will help you get the most out of the platform.
1. Use Multi-Step Zaps for Complex Workflows
Instead of creating multiple single-step Zaps, use multi-step Zaps to link several apps in one workflow. For example:
✅ Capture a new lead from a Facebook Ad → Add the lead to Google Sheets → Send a welcome email via Mailchimp → Notify the sales team on Slack.
2. Take Advantage of Zapier Filters
Filters allow you to run Zaps only when certain conditions are met, preventing unnecessary automation. For example:
✅ Send Slack notifications only for high-priority emails by setting a filter based on subject line keywords.
3. Use Paths to Create Conditional Workflows
Zapier’s Paths feature works like an “if-else” condition. For example:
✅ If a lead is from the U.S., assign them to Sales Rep A.
✅ If a lead is from the U.K., assign them to Sales Rep B.
4. Automate Repetitive Tasks with Zapier Formatter
The Formatter tool helps you modify data before sending it to the next app. You can:
✅ Convert dates into a specific format.
✅ Capitalize names automatically.
✅ Extract specific details from text (e.g., removing “Re:” from email subjects).
5. Use Webhooks for Advanced Automation
For developers and advanced users, Zapier Webhooks allow you to connect apps that aren’t natively supported. This is useful for:
✅ Sending data from custom apps to Zapier.
✅ Integrating internal business tools with external platforms.
6. Set Up Error Notifications
To ensure your Zaps run smoothly, enable Zapier error notifications via email or Slack. This helps you fix issues before they impact your workflow.
7. Utilize Zapier’s Pre-Made Templates
If you’re not sure where to start, Zapier offers pre-made automation templates for common use cases, such as:
✅ Automatically saving email attachments to Google Drive.
✅ Adding new Shopify customers to a CRM.
✅ Posting new blog articles to social media.
8. Monitor and Optimize Your Zaps
Regularly review your Zap history to see if any automations are failing or running inefficiently. Optimize your Zaps by:
✅ Removing unnecessary steps.
✅ Adjusting triggers to avoid excessive task usage.
✅ Combining multiple Zaps into one streamlined workflow.
Common Zapier Mistakes & How to Avoid Them
apier is a powerful automation tool, but setting up workflows (Zaps) incorrectly can lead to inefficiencies and frustration. In this Zapier 101 guide, we’ll cover the most common mistakes users make and how to avoid them.
1. Not Testing Your Zaps Properly
Many users create Zaps and assume they’ll work perfectly. However, skipping the testing phase can lead to errors. How to Avoid: Always use Zapier’s built-in test feature before activating a Zap. Run multiple tests to check for inconsistencies.
2. Using the Wrong Trigger or Action
Choosing an incorrect trigger or action can cause Zaps to fire at the wrong time or not work at all. How to Avoid: Carefully read the descriptions of triggers and actions. If unsure, experiment with different options to ensure proper functionality.
3. Exceeding Zapier’s Task Limit
Every Zap execution counts as a task, and hitting the limit can stop your automations. How to Avoid: Monitor your task usage in Zapier’s dashboard. Optimize your Zaps by reducing unnecessary steps or upgrading your plan if needed.
4. Ignoring Data Formatting Issues
Mismatched data formats can cause Zaps to break or produce incorrect outputs. How to Avoid: Use Zapier’s built-in formatting tools like Formatter by Zapier to clean up and standardize data before passing it between apps.
5. Not Using Filters or Paths Efficiently
Without filters, Zaps may trigger unnecessarily, leading to wasted tasks and inefficiencies. How to Avoid: Use filters to ensure Zaps only run under specific conditions. Paths can also help create different outcomes based on conditions.
6. Overcomplicating Zaps
Adding too many steps can make troubleshooting difficult and increase task consumption. How to Avoid: Keep Zaps simple. If needed, break down complex workflows into multiple Zaps for easier management.
7. Forgetting to Turn Zaps Back On After Edits
Editing a Zap deactivates it, and many users forget to turn it back on. How to Avoid: Always double-check that your Zap is active after making changes.
8. Not Checking Zapier’s App Limitations
Some apps have restrictions on how they integrate with Zapier. How to Avoid: Review Zapier’s documentation for each app before setting up a Zap to understand limitations and workarounds.
9. Neglecting Error Handling
If a step fails, the entire Zap can stop running. How to Avoid: Use Zapier’s error notifications and add fallback steps to handle potential failures.
10. Not Keeping Zaps Updated
Apps frequently update their APIs, which may impact your existing Zaps. How to Avoid: Regularly review and test your Zaps to ensure they are still working as expected.
By avoiding these common Zapier mistakes, you can create smooth, efficient automation that save time and effort. Take the time to test, optimize, and maintain your Zaps for the best results!
Final Thoughts: Is Zapier Right for You?
Zapier is a powerful automation tool that connects thousands of apps, helping businesses and individuals save time and streamline workflows. But is it the right solution for you? Let’s break it down.
When Zapier is a Great Fit
- You Need to Automate Repetitive Tasks: If you find yourself manually transferring data between apps, Zapier can handle it for you.
- You Use Multiple Apps: Zapier supports integrations with over 5,000 apps, making it ideal for businesses relying on various tools.
- You Lack Coding Knowledge: Unlike other automation tools that require programming, Zapier provides a no-code solution for setting up workflows.
- You Want to Improve Efficiency: Automating processes with Zapier saves time, reduces human errors, and enhances productivity.
When Zapier Might Not Be the Best Option
- You Need Complex, Real-Time Integrations: While Zapier handles many use cases, it may not be the best for advanced, large-scale automation requiring real-time data syncing.
- You Have a Limited Budget: The free plan is useful, but for businesses with high automation needs, premium plans may be necessary.
- Your Apps Have Limited Zapier Support: Some apps may have restricted Zapier functionalities, requiring alternative integration methods.
Final Verdict
Zapier is an excellent choice for individuals and businesses looking to automate workflows without coding expertise. If you need a user-friendly, versatile automation tool that integrates with a vast number of apps, Zapier is a great option. However, if you require complex, real-time automation or have a tight budget, you may want to explore alternative solutions.
By understanding your needs and testing Zapier’s capabilities, you can determine if it’s the right fit for you.